(UPDATE 10/11/11 -For French translation of this post please click "here.")
I finished up teaching a still life workshop at the Grand Central Academy of Art about a week ago. While there one of the items we discussed were drawing accurate ellipses in our still-lifes. I thought I would share some of that information here. This information has been of great use to me while drawing cylindrically based objects such as cups and jars in my own still-lifes
I finished up teaching a still life workshop at the Grand Central Academy of Art about a week ago. While there one of the items we discussed were drawing accurate ellipses in our still-lifes. I thought I would share some of that information here. This information has been of great use to me while drawing cylindrically based objects such as cups and jars in my own still-lifes
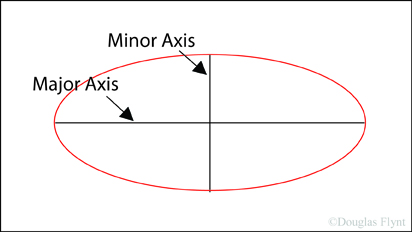
One of the first things we need to know is some terminology pertaining to ellipses. The widest distance across an ellipse is known as the "major axis" while the shortest distance is known as the "minor axis." For a circle the major axis and the minor axis would be the same distance.
With this shared terminology, it is interesting to note that if we take an ellipse and place it in perspective the resulting curvature we perceive is no different than if we were to construct an ellipse at the "picture plane" using the dimensions of the major and minor axes as they appear at this picture plane. The image below shows a circle in perspective on the left and the resulting ellipse that we would see at the picture plane on the right. The curvature of both are the same.

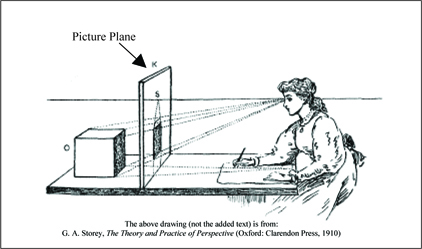
As a quick side note, for those of you unfamiliar with the term picture plane, in perspective it is the imaginary flat surface that is located between the viewer and the object being viewed. The drawing below from G.A. Storey's 1910 book, The Theory and Practice of Perspective gives a good visualization for imagining a picture plane.
Returning to our ellipses, because the ellipse found in perspective and the ellipse constructed at the picture plane both create the same curvature we don't actually have to construct the circles or ellipses we see within our still-lifes in perspective—it should however be noted that the ability to do so is a valuable aid to our conceptual comprehension. Instead, and here is the important part, to draw a ellipse or circle being viewed in perspective we only need to know the dimensions of the major and minor axes as they are perceived at the picture plane. With these dimensions we can correctly construct an ellipse at the picture plane which will correspond to the ellipse or circle being viewed in perspective.
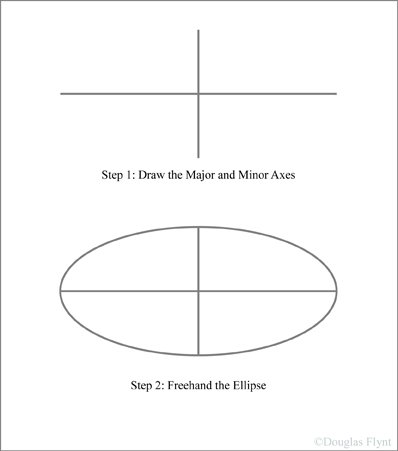
With this knowledge in tow, for now let us only work at the picture plane and construct an ellipse. There are many ways to construct ellipses yet there are two main ways that I usually find myself constructing them (or very often correcting freehanded versions of them). If they are rather small I often just draw the major and minor axes in and then carefully freehand the ellipse checking the symmetry of both sides as I go.
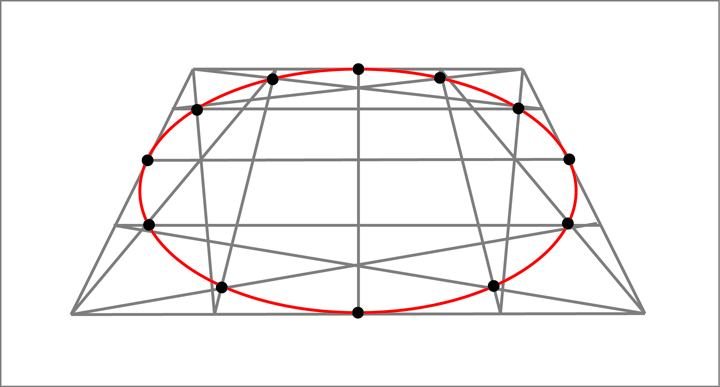
For larger ellipses I construct the following geometrical frame work which gives me 12 points along the ellipse to guide any freehanded approximations.
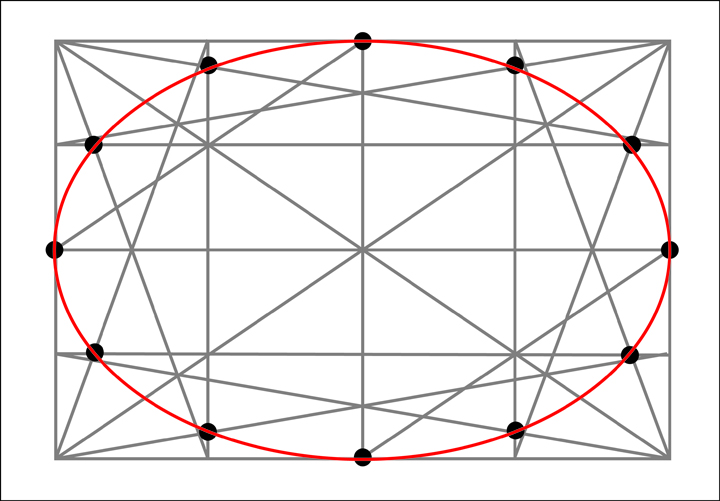
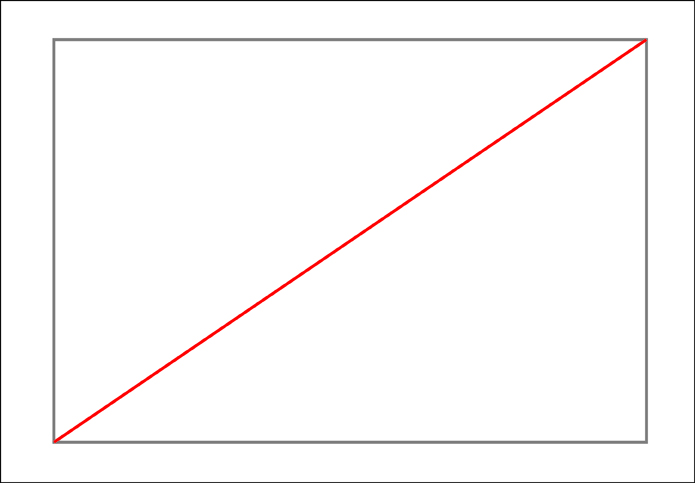
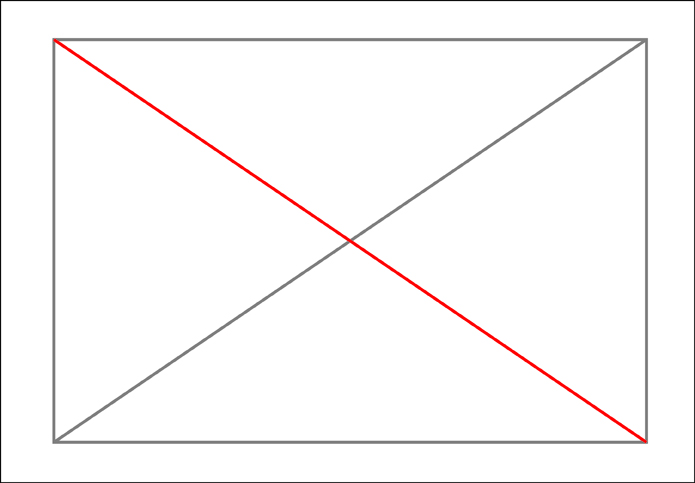
To make the framework I need to first create a rectangle with the proportions of the major and minor axes of the ellipse. I then need to divide this rectangle into 16 equal sections. To make these sections it is useful to remember that a simple “X” created from diagonal corners of the rectangle will always find the center of that rectangle. Along the way we will also gain 4 of our 12 points that make up the ellipse.

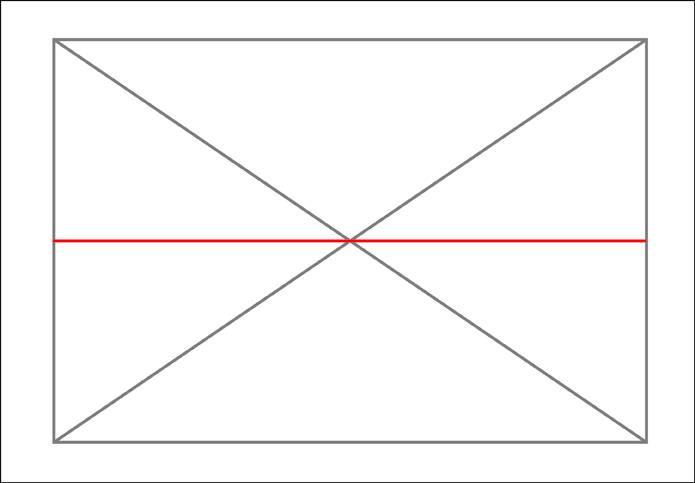
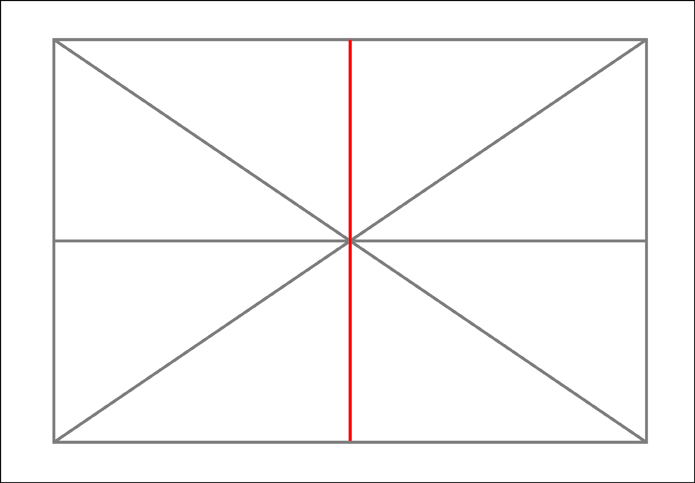

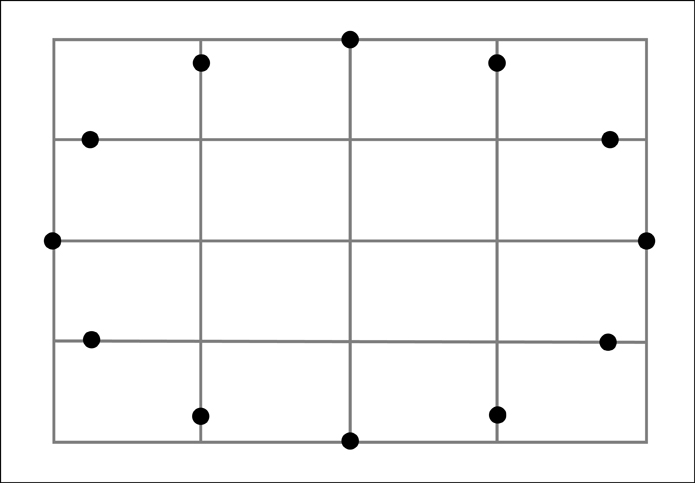
At this point we now know 4 of our points and we have divided our rectangle into 4 equal sections. We now need to divide each of those sections into four more sections.
We now have 16 equal sections. However, before going further let's remove the diagonals used in constructing those sections to keep things from getting too visually confusing.
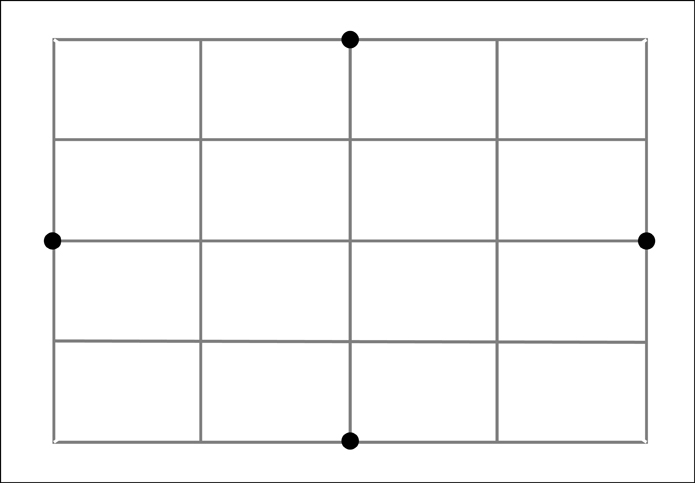
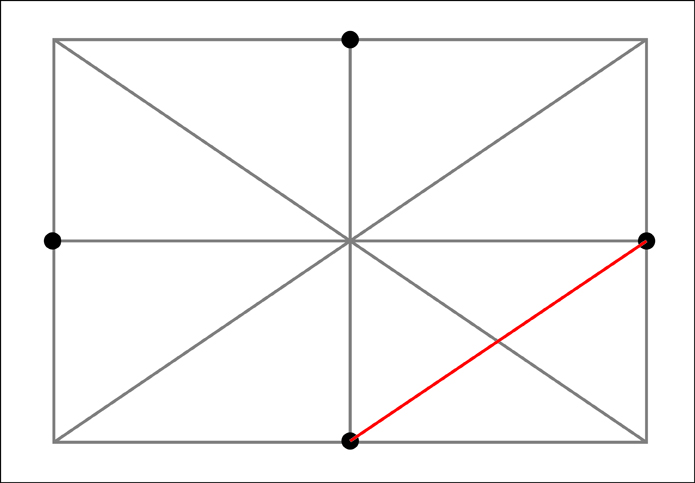
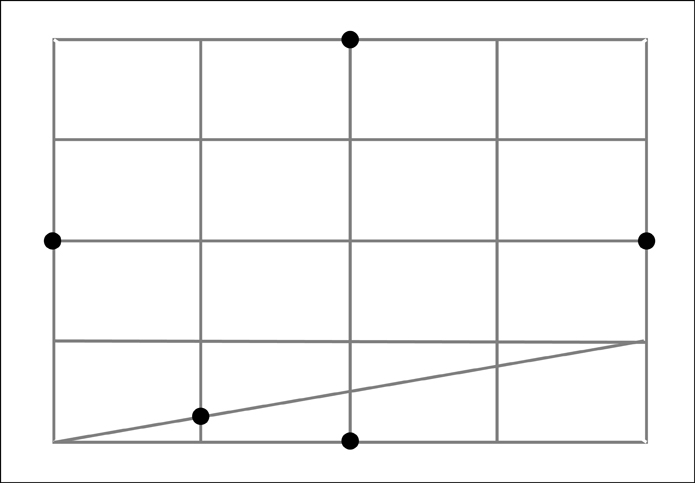
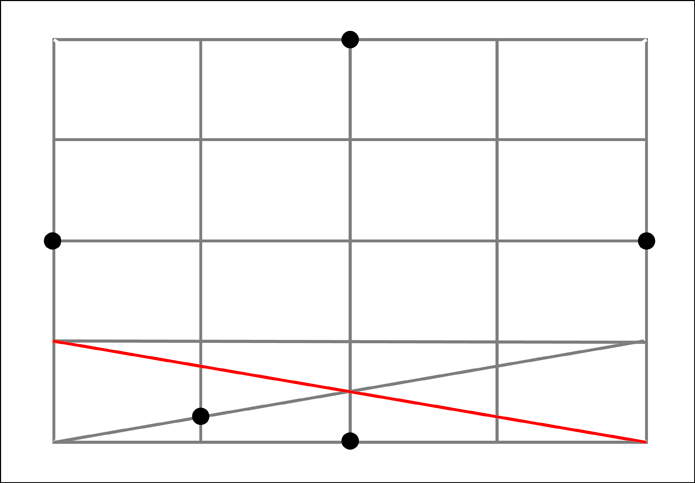
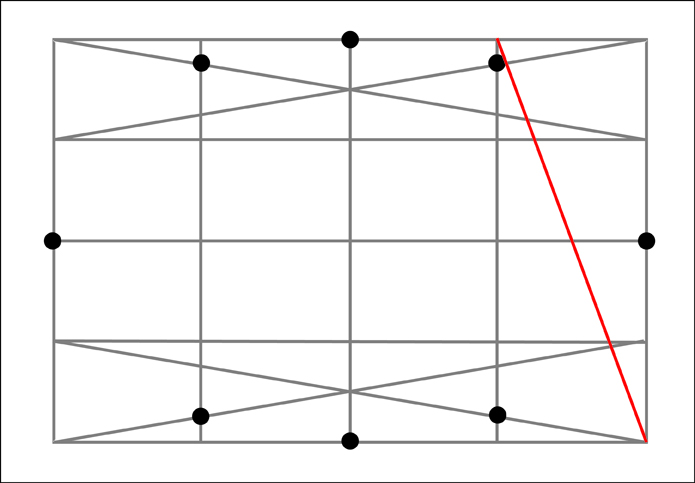
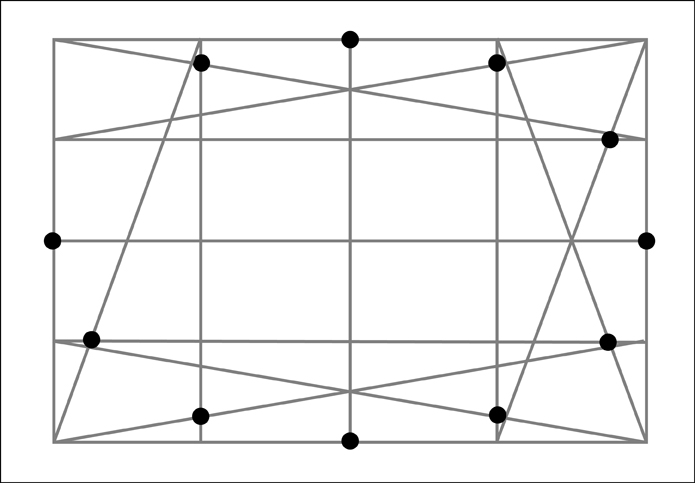
To find the remaining 8 additional points we need to run diagonal lines across the 4 outer sections along each side. Next note where these diagonals intersect the boundaries between the outer four sections of that particular side. At these intersections, the one that is the closest to the outside of our original rectangle will also mark a point along our ellipse. Let's start with the bottom section.

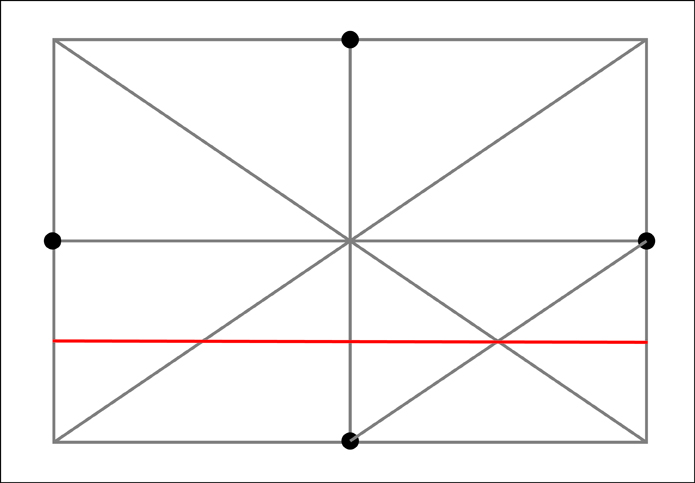
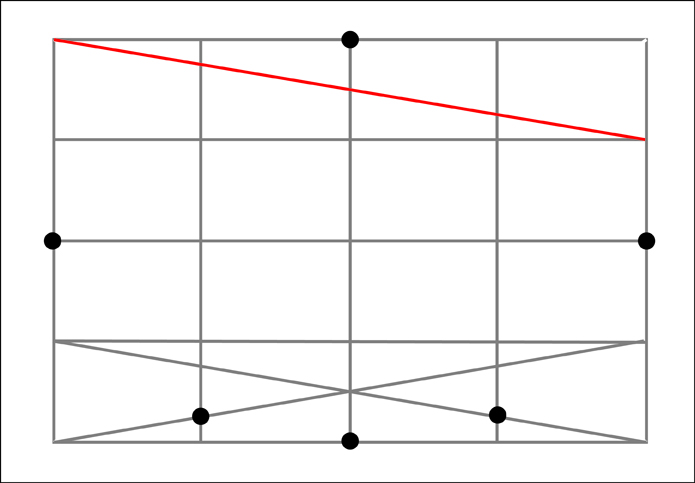
Now for the top section.
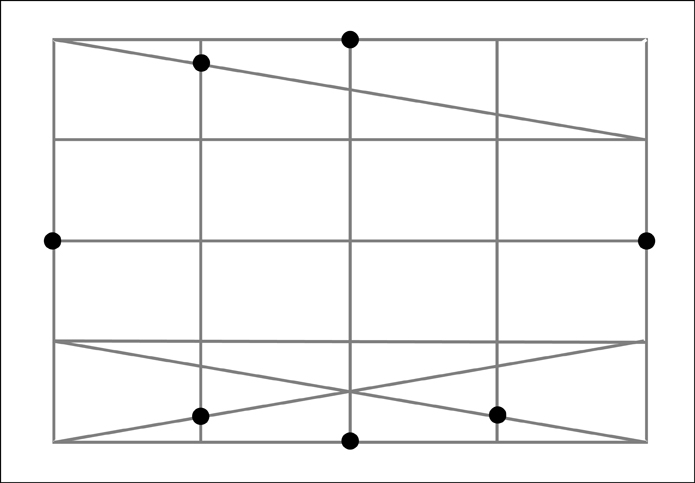


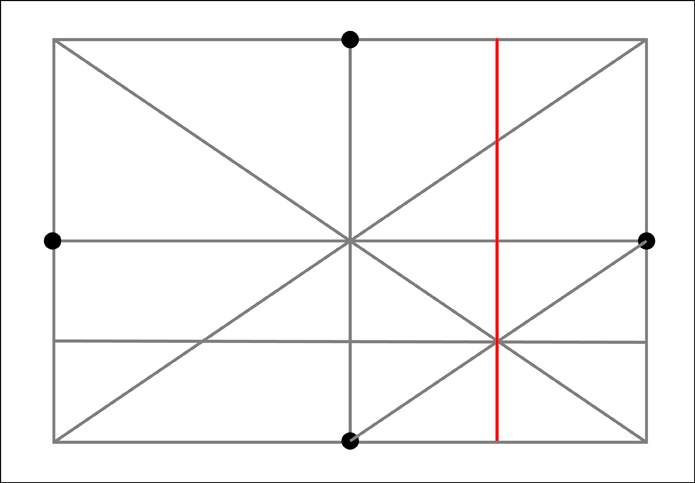
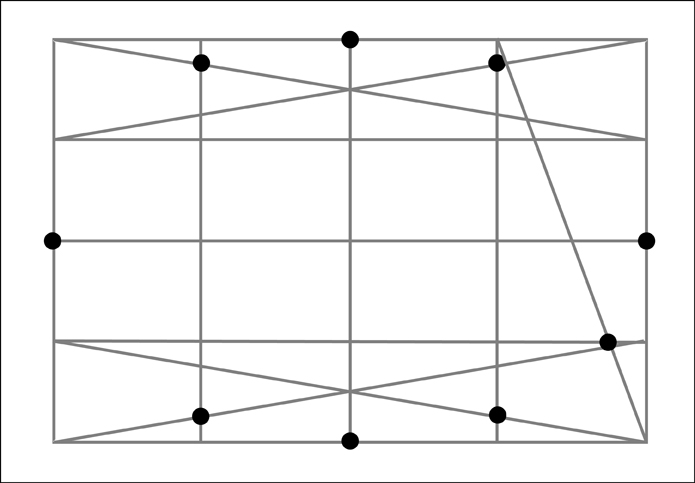
The right section.

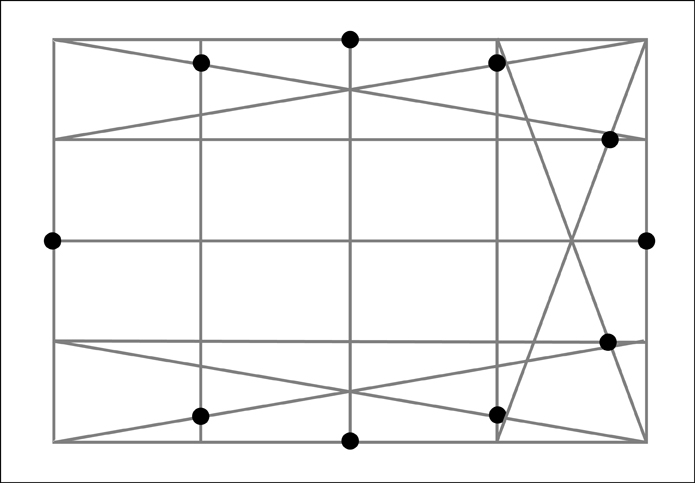
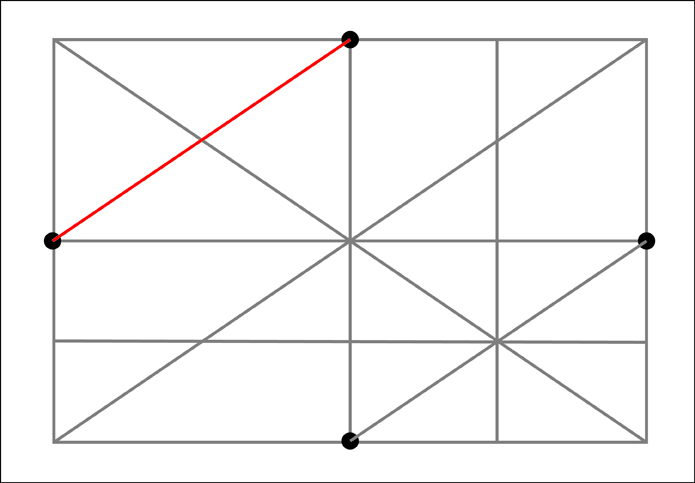
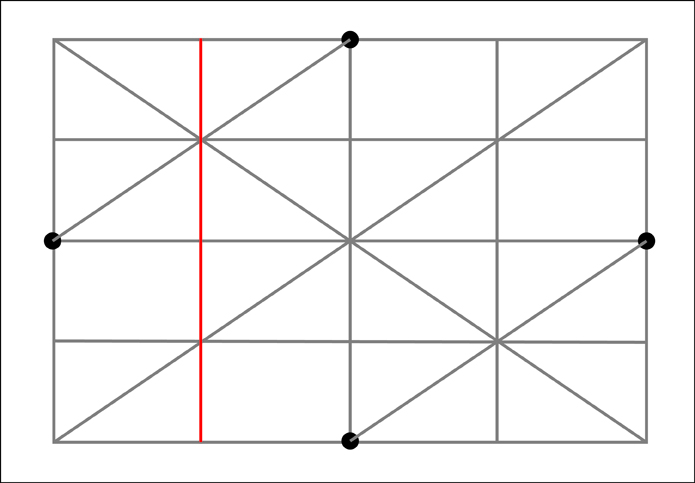
And finally the left section.
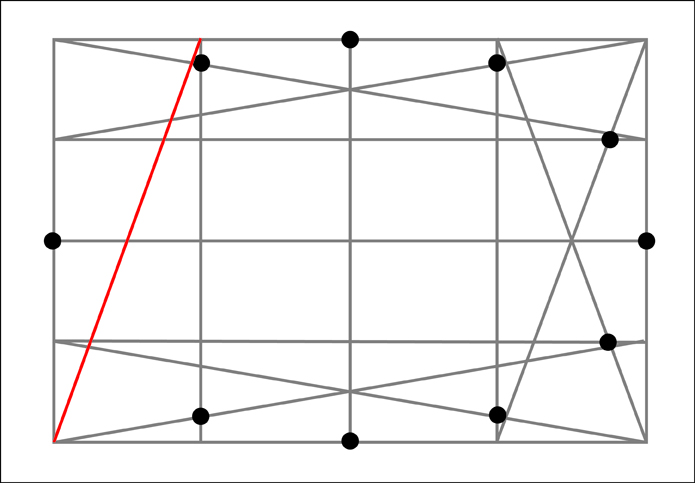

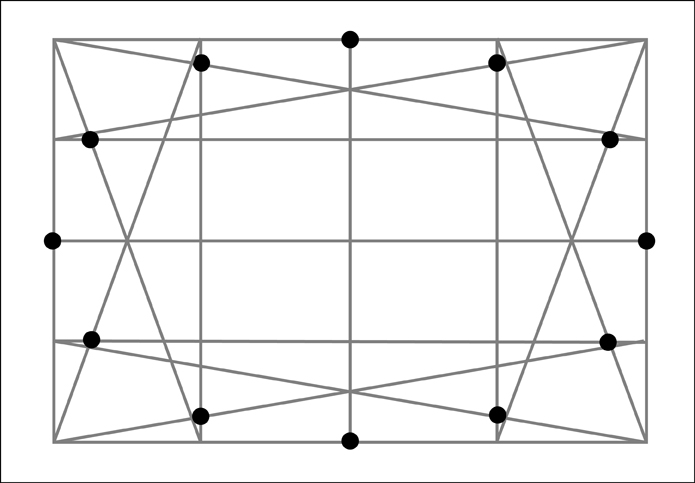
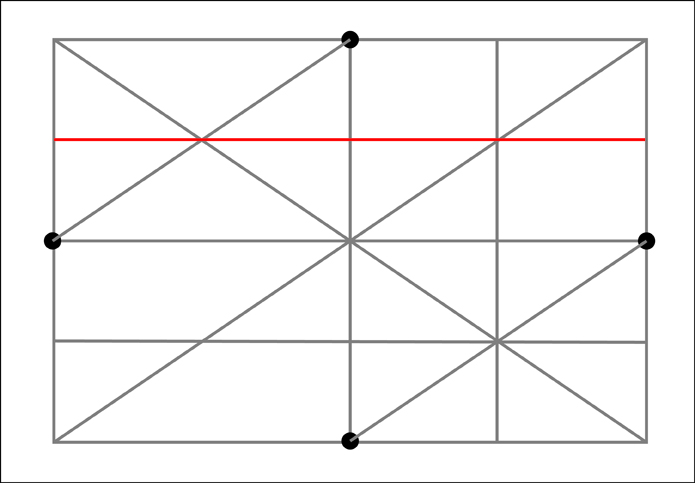
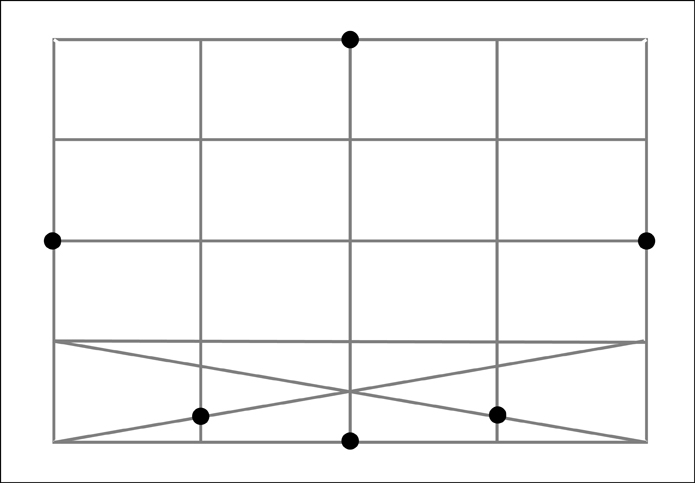
Once again, for clarity let's remove the diagonals used to find the additional points.
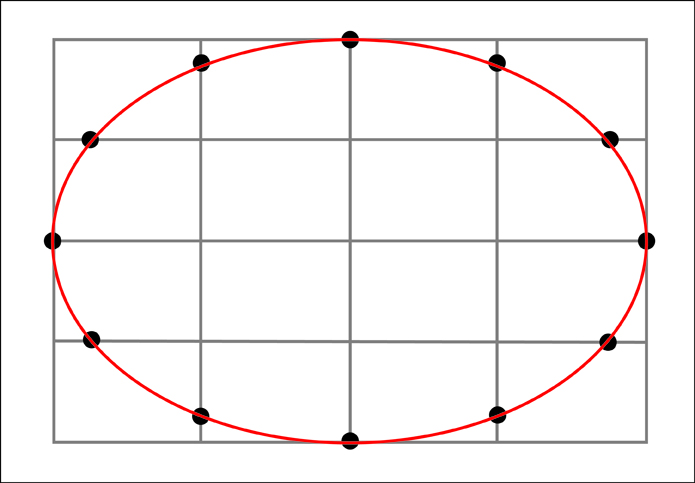
And finally we now have 12 points we can use to aid us in drawing our ellipse!
Leaving the picture plane behind, it is useful to know that this same process works just as well to draw ellipses or circles that are in perspective.
This knowledge has been a resource which I have found very useful in my drawings and paintings. After a couple of times rehearsing the process it becomes fairly easy to commit to memory. Additionally, after constructing a number of ellipses in this formal and structured way I suspect that most people will begin to get more accurate results when free-handing them without such a complex framework.
Going even further, some of you may have already picked up on the fact that the ellipses I have shown in perspective have thus far been in one point perspective with an ellipse that would be directly in front of us (the viewer). It is interesting to note what happens when the ellipse is moved left or right from this center position. In doing so the major and minor axes of the ellipse (as seen at the picture plane) will begin to rotate. They do however continue to stay perpendicular to one another.

There is still plenty more to share on this subject however my busy schedule means that I will have to return to the subject at another time. Yet I hope some of you will benefit from what I have been able to share. And as always, thanks for visiting.
I'm affraid that there is some problem with the images in this post. I cannot see them.
ReplyDeleteSome people have had problems viewing this post. I believe it was because of the number of images and their file size. I have reduced the file size of the images so hopefully you will now be able to view it without problems.
ReplyDeleteHey thanks, this has been really helpful (though some images didn't load for me too, I got the gist with your explanation). An important aspect of perspective drawing I've always wanted to learn.. thanks again!.. :)
ReplyDeleteI have been trying to draw a still life subject for the first time and I have struggled with the ellipses for the last week. I was at the point of giving up totally. This has been extremely helpful, thank you!
ReplyDeleteI so wish I could see the images. I have read how to draw the ellipse--but I wish I could see a demo or read about how to paint them. Even when I've drawn accurately, I can't paint them accurately. There must be some tips on brush handling that would help! --like, which part do you paint first, etc. Thanks for your wonderful blog. Judy
ReplyDeleteCool post I' currently programming 3D renderings for charts. What was confusing to me and also seems to be wrong on the last pictures, is that in perspective, the center of the ellipse is not at the 3D center of the surrounding square. So when trying to calculate the ellipse in a computer program for perspective drawing, one have to be carful to determine the real center of the ellipse.
ReplyDeleteBut for hand sketching this approach is very great. Thank you!
Marco
Essayer, I'm still not sure why images are loading for some viewer and not for others. My apologies but I am glad you enjoyed the post.
ReplyDeleteJudy, thanks for the comment. Glad you enjoyed the post. Perhaps I can do something related to brush handling at some point.
M, please keep in mind that the for the last diagram the center of the ellipse is not the center of the ellipse in perspective, but the center of the ellipse as considered 2-dimensionally as it would appear at the picture plane. The main assertion is that the correct curvature for an ellipse in perspective can also be created 2-dmensionally (upon the picture plane). The construction at the picture plane will not have the some center as the ellipse being seen in perspective. You are correct that the knowledge isn't particularly valuable for 3d rendering, but it is when sketching in a 2d manner. Thanks for the comment.
I teach plumbing. I have been searching for an easy way to teach how to make an elipse for the purpose of how to cut an eliptical shape from a sloping surface when passing a pipe through. Seems a bit complicated to start but once done 4 or 5 times it becomes quite natural. Many thanks for this clip.
DeleteGlad you were able to make use of the information Ken. Thanks for the comment!
DeleteThis information is fantastic and is exactly what I needed. My first few attempts didn't look great, then I tried the vanishing point further away - and it works a treat. Thanks so much! Now I just need some rules for drawing several related elipses (eg, top of a glass, bottom of glass and the surface of the liquid).
ReplyDeleteReally great explanations here. One cheating method one can do is if you have a photo reference of your subject, bring it into an editing program like photoshop or MS publisher, customize your page size to the same as your canvas, import your photo ref, then drag in your ellipse over top of the image until it matches, dont forget to rotate the ellipse to match a two point perspective. Once you have that exact match, copy and paste that ellipse shape into a standard 8.5x11" page and print it. Cut the shape out with scissors, now you have an ellipse template to trace. Seems like a lot of work but it's well worth knowing that your ellipse is exactly correct especially if you use this method in concert with a grid drawing method. As a semi professional artist It's worth knowing that that shape IS correct rather than freehanding it hoping it works out. I don't mind a little non traditional methods to make up for my drawing shortfalls.
ReplyDeleteThnx for sharing this handy method of construction! Hm what I've never quite understood about a circle in perspective being an ellipse: If we look at the grid with circle inside, drawn in perspective (this one:)
ReplyDeletehttp://douglasflynt.com/ellipses/circle_in_perspective.jpg
then it is obvious (or not) that the size of the squares decreases as they recede into the distance. The circle is divided in half by the squares, so how then can the circle in perspective by symmetric with respect to the horizontal axis? (ie like the ellipse is.) Shouldn't the top half of the circle in perspective (the half farthest away) be narrower that the bottom half (the half closest to us)? Because the top half of the circle is enclosed in the squares that recede in the distance and the bottom half of the circle is enclosed in the squares that are closest to us...
Thanks for the question. So, when viewing a circle in perspective the ellipse at the circle’s true midway point is not the widest point. The widest point will be slightly below it, corresponding to the major axis of the ellipse. This is why I mentioned earlier in this post, “it is interesting to note that if we take an ellipse and place it in perspective the resulting curvature we perceive is no different than if we were to construct an ellipse at the "picture plane" using the dimensions of the major and minor axes as they appear at this picture plane.” Hope that helps!
DeleteThis is one awesome technique that I haven't found anyplace else! Thank you!
ReplyDeleteI never visualized the axis rotation as the circle moves left or right. Amazing that basic concept I did not know and I've been drawing since 1972, when I was 2. :) Thank you for sharing this.
ReplyDeleteAwesome! Never seen this before, and I have studied eclipses quite a bit, in the context of astronomy. I would love to figure out why this works.
ReplyDeleteRespect and that i have a super provide: House Renovation house renovation companies
ReplyDelete